Animations
適當的使用動畫效果可以提升使用者體驗,利用轉場效果來掩飾一些需要等待的動作,Angular Animations 在 4 版大改版之後,變得容易上手,好用,這章節會來介紹 Angular Animations
Angular animations 是建構在 Web Animations API 上,當一些早期瀏覽器會遇到不支援的情形,這時候可將 polyfills 內的 web-animation-js 打開就可以了
設定
Animation 的 package 名稱是 @angular/animations,但是要 import 的 module 卻是在 @angular/platform-browser/animations
import { BrowserAnimationsModule } from '@angular/platform-browser/animations';
...
@NgModule({
  ...
  imports: [
    BrowserModule,
    BrowserAnimationsModule
  ],
  ...
})
export class AppModule { }
當我們在根模組內 import 完動畫模組後,即完成最基本的設定了。在 @angular/platform-browser/animations 內還有另外一個跟 Animations 有關的模組叫做 NoopAnimationsModule,這個模組的用意是當我們不想要啟用動畫,但是又不想去改已經使用動畫的 Components 時,這時候就可以 import NoopAnimationsModule 來達到無動畫的設定
範例
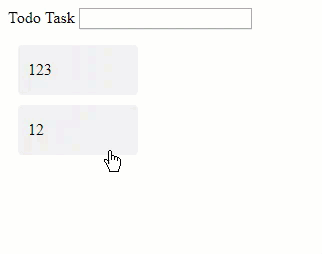
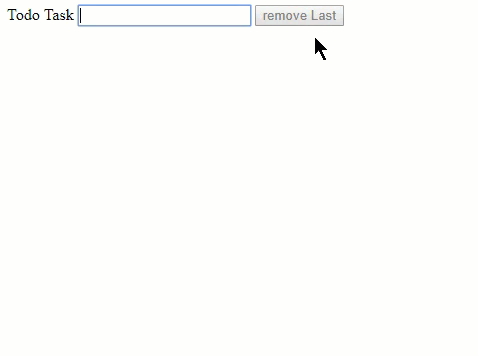
建立一個清單,新增或是移除項目時,使用動畫效果
TodoService
import { Injectable } from '@angular/core';

export class Todo {
  constructor(public task: string, public state = 'incompleted') {}

  toggleState() {
    this.state = this.state === 'incompleted' ? 'completed' : 'incompleted';
  }
}

@Injectable()
export class TodoService {
  todos: Todo[] = [];

  addTodo(task) {
    this.todos.push(new Todo(task));
  }

  canRemove() {
    return this.todos.length > 0;
  }

  removeTodo() {
    this.todos.length -= 1;
  }
}
app.component.ts
import { Component } from '@angular/core';
import { trigger, state, style, animate, transition } from '@angular/animations';
import { TodoService } from './todo.service';

@Component({
  selector: 'app-root',
  template: `
  <label>Todo Task</label>
  <input type="text" #task (keyup.enter)="addTodo(task.value); task.value=''"/>
  <ul>
    <li *ngFor="let todo of todos"
        [@todoState]="todo.state"
        (click)="todo.toggleState()">
      {{todo.task}}
    </li>
  </ul>
  `,
  styleUrls: ['./app.component.css'],
  animations: [
    trigger('todoState', [
      state(
        'incompleted',
        style({
          backgroundColor: '#eee',
          transform: 'scale(1)'
        })
      ),
      state(
        'completed',
        style({
          backgroundColor: '#cfd8dc',
          transform: 'scale(1.1)'
        })
      ),
      transition('incompleted => completed', animate('100ms ease-in')),
      transition('completed => incompleted', animate('100ms ease-out'))
    ])
  ]
})
export class AppComponent {
  todos = this.todoService.todos;

  addTodo(task) {
    this.todoService.addTodo(task);
  }
  constructor(private todoService: TodoService) {}
}
細部說明
 <li *ngFor="let todo of todos"
     [@todoState]="todo.state"
     (click)="todo.toggleState()">
   {{todo.task}}
</li>
[@todoState]連結animations的trigger項目
animations: [
    trigger('todoState', [
      state(
        'incompleted',
        style({
          backgroundColor: '#eee',
          transform: 'scale(1)'
        })
      ),
      state(
        'completed',
        style({
          backgroundColor: '#cfd8dc',
          transform: 'scale(1.1)'
        })
      ),
      transition('incompleted => completed', animate('100ms ease-in')),
      transition('completed => incompleted', animate('100ms ease-out'))
    ])
  ]
動畫會設定在
animations:[]的區塊內使用
trigger設定動畫animations 重要元素之一
state,動畫的效果是透過轉換 state 來完成相關的轉場效果state設定初始狀態transition過場效果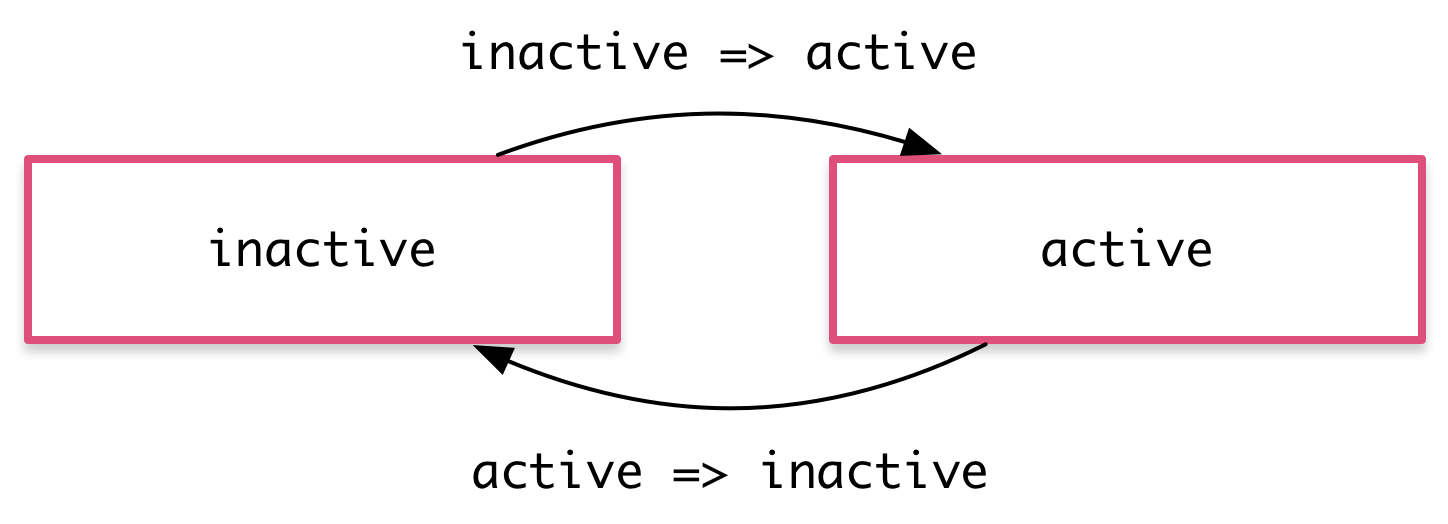
如果多個 state 有相同的過場效果,可以寫在一起
transition('inactive => active, active => inactive',
 animate('100ms ease-out'))
如果是兩個 state 間切換時,可以透過雙箭頭來表示
transition('inactive <=> active', animate('100ms ease-out'))
效果
延伸說明
transaction
除了上述的 state 間的設定,也可以針對轉場效果做進一步的設定,這邊的設定只會存活在過場動畫時,當轉換結束時,樣式也會失效了。所以要固定最後的顯示效果,就必須定義在 state 下
transition('incompleted => completed', [
        style({
          backgroundColor: '#cfd8dc',
          transform: 'scale(1.3)'
        }),
        animate(
          '80ms ease-in',
          style({
            backgroundColor: '#eee',
            transform: 'scale(1)'
          })
        )
      ])
wildcard state *
the * (wildcard) 可代表任何 state,使用範例
completed => *代表從completed到任何階段都會觸發轉場動畫* => *表示任何異動都會觸發轉場動畫
![]()
void state
void state 會發生在元素尚未附加到顯示畫面上,或是從顯示畫面移除,通常會使用在元素進入和離開的情境
![]()
延伸變化
示範進入離開的效果
transition('void => *', [style({ transform: 'translateX(-100%)' }), animate(100)]),
transition('* => void', [animate(100, style({ transform: 'translateX(100%)' }))])
新增這兩個新增 transition 效果,當新增項目時,元素會從左邊飛進來,當移除時,會往右邊飛走
另外一種表示法式使用 :enter 和 :leave 來替代 void=>* 與 *=>void,效果是一樣的
transition(':enter', [style({ transform: 'translateX(-100%)' }), animate(100)]),
transition(':leave', [animate(100, style({ transform: 'translateX(100%)' }))])
多狀態進入離開
- Incompleted todo 進入:
void => incompleted - Completed todo 進入:
void => completed - Incompleted todo 離開:
incompleted => void - Completed todo 離開:
completed=> void
 transition('void => incompleted', [
   style({transform: 'translateX(-100%) scale(1)'}),
   animate(100)
 ]),
   transition('incompleted => void', [
   animate(100, style({transform: 'translateX(100%) scale(1)'}))
 ]),
   transition('void => completed', [
   style({transform: 'translateX(0) scale(0)'}),
   animate(200)
 ]),
   transition('completed => void', [
   animate(200, style({transform: 'translateX(0) scale(0)'}))
 ])
![]()