單元測試
一般來說,單純測試邏輯的測試是最簡單的,因為不需要去理會頁面上的變化,只針對單一的函式分別測試,但在往下探討前,我們先把一個用來學習測試的環境建構出來,透過 Angular CLI 的幫忙,可以快速地完成這個任務,請跟著下列的動作完成
- 執行
ng new <projectName> - 等待 npm install
- 當 npm install 完成後,進入專案資料夾
- 執行
ng test - 打完收工
CLI 預設會先幫我們建立一個 app.component.spec.ts 的測試檔案,先將該檔案打開,會是一個最簡單的測試,這測試屬於整合測試,會在下一章節討論
import { TestBed, async } from '@angular/core/testing';

import { AppComponent } from './app.component';

describe('AppComponent', () => {
  beforeEach(async(() => {
    TestBed.configureTestingModule({
      declarations: [
        AppComponent
      ],
    }).compileComponents();
  }));

  it('should create the app', async(() => {
    const fixture = TestBed.createComponent(AppComponent);
    const app = fixture.debugElement.componentInstance;
    expect(app).toBeTruthy();
  }));

  it(`should have as title 'app'`, async(() => {
    const fixture = TestBed.createComponent(AppComponent);
    const app = fixture.debugElement.componentInstance;
    expect(app.title).toEqual('app');
  }));

  it('should render title in a h1 tag', async(() => {
    const fixture = TestBed.createComponent(AppComponent);
    fixture.detectChanges();
    const compiled = fixture.debugElement.nativeElement;
    expect(compiled.querySelector('h1').textContent).toContain('Welcome to app!');
  }));
});
Jasmine 的測試都是函式,所以 Clean Code 準則也適用在撰寫測試案例上,例如
- 函式需維持小而巧,行數需在 10 行以內
- 適當的命名,it 的描述要清楚
- 單一職責,一個案例只做一種測試項目
現在,請先將這個檔案刪除,在接下來的內容,我們會一一介紹單元測試的測試方法。
基本測試流程
建立一個資料夾 unit-test-practice,在裡面建立一個 increase.ts 檔案,並在內寫一個簡單的函式
export function increase(number) {
  if (number < 0) {
    return 0;
  }
  return number + 1;
}
接著,在同一個資料夾下,建立一個 increase.spec.ts 測試檔案
import {increase} from './increase';

describe('測試 increase 函式', () => {
  it('如果傳入值小於0時,應該回傳 0', () => {
    const result = increase(-1);
    expect(result).toBe(0);
  });
});
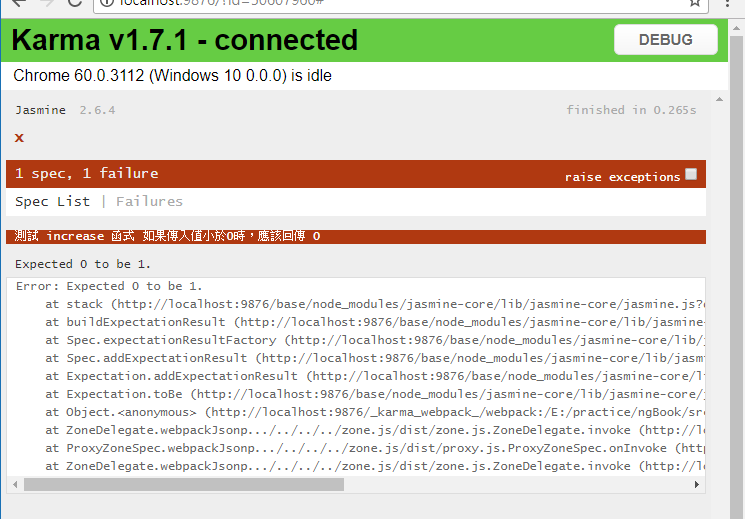
現在,我們要執行測試,在命令視窗或是 terminal 下,執行 ng test 的指令,CLI 會使用 Karma 來執行所有的測試工作,當 ng test 被執行時,預設是監聽模式,表示當檔案異動時,就會重新執行測試,執行結果如下

測試失敗的情形是這樣子

除了從命令視窗內看到測試結果,Karma 預設會開啟用來一個跑測試的瀏覽器,在瀏覽器頁面上也可以看到一樣的訊息
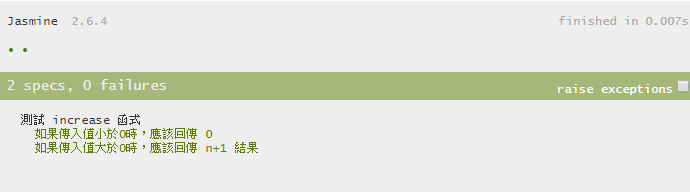
完成剩下的測試,將原本的測試案例,選起來後按下 alt+shift+ arrow down 就會在原本的程式碼下複製一份一樣的
import {increase} from './increase';

describe('測試 increase 函式', () => {
  it('如果傳入值小於0時,應該回傳 0', () => {
    const result = increase(-1);
    expect(result).toBe(0);
  });
  it('如果傳入值大於0時,應該回傳 n+1 結果', () => {
    const result = increase(0);
    expect(result).toBe(1);
  });
});
測試結果
測試基本準則
測試文字與陣列應該算是很常見的測試情境,我們先建立一個 hello-world.ts 檔案並建立 helloWorld 函式
export function helloWorld(name) {
  return `Hello ` + name;
}
接下來,我們需要思考的是,需要寫那些測試案例來測試這個函式
import { helloWorld } from './hello-world';
describe('hello world', () => {
  it('should include the name the message', () => {
    expect(helloWorld('kevin')).toBe('Hello kevin');
  });
});
這個測試案例的結果是成功的,但是當 helloWorld 函式修改輸出格式時,就會造成測試案例失敗,這時我們要思考的是測試重點是在哪裡? 是完整的測試結果呢? 還是傳進去的資料會包含在測試結果內呢?
import { helloWorld } from './hello-world';
describe('hello world', () => {
  it('should include the name the message', () => {
    expect(helloWorld('kevin')).toContain('kevin');
  });
});
這樣子的寫法,不論 helloWorld 的輸出格式怎麼改,測試都會成功。
準則:Tests should not be fragile
同樣的精神,是用於測試陣列,建立一個 get-cities.ts 檔案並建立 getCities 函式
export function getCities() {
  return ['台中市', '台北市', '高雄市'];
}
get-cities.spec.ts ,測試的順序不受限於要測試的資料
import { getCities } from './get-cities';

describe('getCties', () => {
  it('should return city list', () => {
    const cities = getCities();
    expect(cities).toContain('高雄市');
    expect(cities).toContain('台中市');
    expect(cities).toContain('台北市');
  });
});
測試 Angular
測試 Angular Component 有兩種方式,這一章節會使用最單純的方式來測試 Angular,而下一章節會使用 Angular 所提供的 TestBed 來做測試
先建立一個 component,執行 ng new c vote 來建立 VoteComponent,建立完後,先將 vote.component.spec.ts 的內容先整理剩下這些程式碼
import { VoteComponent } from './vote.component';
describe('VoteComponent', () => {});
VoteComponent 內會做兩件事情,upVote 與 downVote,還會有一個記錄目前 vote 的結果
...
export class VoteComponent {
  totalVote = 0;

  upVote() {
    this.totalVote++;
  }

  downVote() {
    this.totalVote--;
  }
}
測試 upVote
import { VoteComponent } from './vote.component';
describe('VoteComponent', () => {
    it('should increment totalValues when upVote', () => {
      const component = new VoteComponent();
      component.upVote();
      expect(component.totalVote).toBe(1);
  });
});
測試 downVote
import { VoteComponent } from './vote.component';
describe('VoteComponent', () => {
    ...
    it('should decrement totalValues when downVote', () => {
      const component = new VoteComponent();
      component.downVote();
      expect(component.totalVote).toBe(-1);
  });
});
重構
import { VoteComponent } from './vote.component';

describe('VoteComponent', () => {
  it('should increment totalValues when upVote', () => {
    const component = new VoteComponent();
    component.upVote();
    expect(component.totalVote).toBe(1);
  });
  it('should decrement totalValues when downVote', () => {
    const component = new VoteComponent();
    component.downVote();
    expect(component.totalVote).toBe(-1);
  });
});
這兩個測試案例中,const component = new VoteComponent() 重複了,jasmine 提供了 beforeEach 的方法,在執行每一個測試前,會先執行 beforeEach 內的程式,所以可以將 new VoteComponent() 的動作搬到 beforeEach 內
describe('VoteComponent', () => {
  let component: VoteComponent;
  beforeEach(() => {
    component = new VoteComponent();
  });
  it('should increment totalValues when upVote', () => {
    component.upVote();
    expect(component.totalVote).toBe(1);
  });
  it('should decrement totalValues when downVote', () => {
    component.downVote();
    expect(component.totalVote).toBe(-1);
  });
});
除了 beforeEach ,jasmine 還提供了以下 API,協助我們在執行測試前後能將環境給設定完成
- Setup
- beforeAll:在 describe 內所有 spec 之前執行,每個 describe 只會執行一次
- beforeEach:在 describe 內每個 spec 之前執行
- Tear down
- afterEach:在 describe 內每個 spec 之後執行
- afterAll:在 describe 內所有 spec 之後執行,每個 describe 只會執行一次
Forms
Angular 表單有兩種機制,容易測試的是 Model Driven 的表單模式。
import { Component, OnInit } from '@angular/core';
import { FormBuilder, FormGroup, Validators } from '@angular/forms';

@Component({
  selector: 'app-todo-form',
  templateUrl: './todo-form.component.html',
  styleUrls: ['./todo-form.component.css']
})
export class TodoFormComponent {
  form: FormGroup;
  constructor(fb: FormBuilder) {
    this.form = fb.group({
      name: ['', Validators.required],
      email: ['']
    });
  }
}
測試檔案
import { FormBuilder } from '@angular/forms';
import { TodoFormComponent } from './todo-form.component';

describe('TodoFormComponent', () => {
  let component: TodoFormComponent;

  beforeEach(() => {
    component = new TodoFormComponent(new FormBuilder());
  });
  ...
});
在 beforeEach 區塊裡,因為 TodoFormComponent 需要一個 FormBuilder 的引數,這樣就可以完成建立 TodoFormComponent 了
先來測試是否有成功建立兩個 controls
 it('should create a form with 2 controls', () => {
    expect(component.form.contains('name')).toBeTruthy();
    expect(component.form.contains('email')).toBeTruthy();
  });
另外一個需要測試的是,name control 為必填欄位的情境
it('should make the name controls rquired', () => {
    const control = component.form.get('name');
    control.setValue('');
    expect(control.valid).toBeFalsy();
  });
這樣子就是簡單的表單測試了,這也是為什麼 Angular Team 說 ModelDriven 模式,程式很容易被測試的原因了
EventEmitter
修正一下原本的 VoteComponent,多加上一個 voteChanged 的 EventEmitter,EventEmitter 通常搭配 @Output 一起使用
export class VoteComponent {
  totalVote = 0;
  voteChanged = new EventEmitter();

  upVote() {
    this.totalVote++;
    this.voteChanged.emit(this.totalVote);
  }
}
因為 EventEmitter 是一個 Observable,所以必須使用 subscribe 才可以取得資料,測試案例如下
  it('should raise voteChanged event when upvoted', () => {
    let totalValue = null;
    component.voteChanged.subscribe(value => {
      totalValue = value;
    });
    component.upVote();
    expect(totalValue).toEqual(1);
  });
Spies
spy 是另外一個很重要的手法,有時候一個 component 會注入其他的 services 去呼叫 API 或是邏輯計算,但是,services 會執行哪些事情並不是我們所在乎的,這時候就需要透過 spy 的手法來處理
一個 TodosComponent 注入了一個 service,並透過 service 取得 todos 的清單
import { Observable } from 'rxjs/Observable';
import { Injectable } from '@angular/core';
import { HttpClient } from '@angular/common/http';

@Injectable()
export class TodoService {
  constructor(private http: HttpClient) {}

  getTodos(): Observable<any[]> {
    return this.http.get<any[]>('/todos');
  }
}
export class TodosComponent implements OnInit {
  todos = [];
  constructor(private todoService: TodoService) {}

  ngOnInit() {
    this.todoService.getTodos().subscribe(value => (this.todos = value));
  }
}
測試檔案
describe('TodosComponent', () => {
  let component: TodosComponent;
  let service: TodoService;

  beforeEach(() => {
    service = new TodoService(null);
    component = new TodosComponent(service);
  });
});
TodoService 傳入 null 是因為我不會也不希望去讀取真正的 API,所以 service 所需的 HttpClient 就不需要存在了
it('should get todos item from the services', () => {
  const todos = [1, 2, 3];
  spyOn(service, 'getTodos').and.returnValue(Observable.of(todos));
  component.ngOnInit();
  expect(component.todos).toEqual(todos);
});
spyOn 是 jasmine 提供的 spies API,主要功能是針對物件內的某函式,提供假資料給該函式回傳使用,當有使用到該函式時, spyOn 會攔截到並介入回傳所設定的回傳結果
spyOn 還有其他使用方式
spyOn(object, 'method').and.<spies method>
Spies Methods
callThrough: 直接使用原本 object 的 method
describe("A spy, when configured to call through", function() {
  var foo, bar, fetchedBar;

  beforeEach(function() {
    foo = {
      setBar: function(value) {
        bar = value;
      },
      getBar: function() {
        return bar;
      }
    };

    spyOn(foo, 'getBar').and.callThrough();

    foo.setBar(123);
    fetchedBar = foo.getBar();
  });

  it("tracks that the spy was called", function() {
    expect(foo.getBar).toHaveBeenCalled();
  });

  it("should not affect other functions", function() {
    expect(bar).toEqual(123);
  });

  it("when called returns the requested value", function() {
    expect(fetchedBar).toEqual(123);
  });
});
returnValue:回傳給予的值
describe("A spy, when configured to fake a return value", function() {
  var foo, bar, fetchedBar;

  beforeEach(function() {
    foo = {
      setBar: function(value) {
        bar = value;
      },
      getBar: function() {
        return bar;
      }
    };

    spyOn(foo, "getBar").and.returnValue(745);

    foo.setBar(123);
    fetchedBar = foo.getBar();
  });

  it("tracks that the spy was called", function() {
    expect(foo.getBar).toHaveBeenCalled();
  });

  it("should not affect other functions", function() {
    expect(bar).toEqual(123);
  });

  it("when called returns the requested value", function() {
    expect(fetchedBar).toEqual(745);
  });
});
callFake:自訂一個新的函式內容來替代原本的函式
describe("A spy, when configured with an alternate implementation", function() {
  var foo, bar, fetchedBar;

  beforeEach(function() {
    foo = {
      setBar: function(value) {
        bar = value;
      },
      getBar: function() {
        return bar;
      }
    };

    spyOn(foo, "getBar").and.callFake(function(arguments, can, be, received) {
      return 1001;
    });

    foo.setBar(123);
    fetchedBar = foo.getBar();
  });

  it("tracks that the spy was called", function() {
    expect(foo.getBar).toHaveBeenCalled();
  });

  it("should not affect other functions", function() {
    expect(bar).toEqual(123);
  });

  it("when called returns the requested value", function() {
    expect(fetchedBar).toEqual(1001);
  });
});
throwError:回傳錯誤
describe("A spy, when configured to throw an error", function() {
  var foo, bar;

  beforeEach(function() {
    foo = {
      setBar: function(value) {
        bar = value;
      }
    };

    spyOn(foo, "setBar").and.throwError("quux");
  });

  it("throws the value", function() {
    expect(function() {
      foo.setBar(123)
    }).toThrowError("quux");
  });
});
Spy也可以用在 expect 內
any: 判斷 object 的函式是否有被呼叫過
 it('should get todos item from the services', () => {
    const todos = [1, 2, 3];
    const spy = spyOn(service, 'getTodos');
    spy.and.returnValue(Observable.of(todos));

    component.ngOnInit();
    expect(spy.calls.any()).toBeTruthy();
  });
count:判斷 object 的函式呼叫次數
  it('should get todos item from the services', () => {
    const todos = [1, 2, 3];
    const spy = spyOn(service, 'getTodos');
    spy.and.returnValue(Observable.of(todos));

    component.ngOnInit();
    expect(spy.calls.count()).toBe(1);
  });
args:取得特定位置的引數
 it("tracks the arguments of each call", function() {
    foo.setBar(123);
    foo.setBar(456, "baz");

    expect(foo.setBar.calls.argsFor(0)).toEqual([123]);
    expect(foo.setBar.calls.argsFor(1)).toEqual([456, "baz"]);
  });
allArgs:取得所有引數
  it("tracks the arguments of all calls", function() {
    foo.setBar(123);
    foo.setBar(456, "baz");

    expect(foo.setBar.calls.allArgs()).toEqual([[123],[456, "baz"]]);
  });
reset:清除所有追蹤狀態
而 expect 其實也有相對應於 spy.calls.any() 與 spy.calls.count() 的判斷是,分別是 toHaveBeenCalled() 與 toHaveBeenCalledTimes ,用法很類似
it('should get todos item from the services', () => {
    const todos = [1, 2, 3];
    const spy = spyOn(service, 'getTodos').and.returnValue(Observable.of(todos));

    component.ngOnInit();
    // calls.any()
    expect(spy).toHaveBeenCalled();
    // calls.count()
    expect(spy).toHaveBeenCalledTimes(1);
    // calls.allArgs()
    expect(spy).toHaveBeenCalledWith();
  });
Limitation
開發應用程式的過程中,單元測試佔整體的測試比例,大約是 70% 左右,雖然比例很高,還是有些限制是單元測試沒有辦法處理的,例如:Routers、Template bindings等,這些行為必須在 Angular 的環境下才能被測試,所以在下一個章節內,會來討論如何測試上述的情境